Free body diagram
One of the challenges many people encounters while studying physics is the necessary visualization of scenes, the variables and the overall problems with their reference frames which one has to take into account and resolve.
For that, this lesson will focus on one of physics' best known tools for visual aid and analysis: the physics free body diagram (usually just called a free body diagram).
What is a free body diagram
Free body diagrams are graphic representations of all of the forces (and their characteristics) which are being applied to a body. Depending on the type of system you are studying, a free body diagram will depict either external forces being applied to a body or internal forces resulting from internal processes inside the body.
After learning the free body diagram definition, is easy to see why these are sometimes called force diagrams, since they are drawings dedicated to depict and give information about all of the forces being applied to an object. Something important to note too is that, since forces are vector quantities (they have a magnitude and a direction), a free body diagram of forces happens to be a type of vector diagram too, one of the simplest to create, understand and use.
On these vector diagrams, as anywhere else, we use arrows to represent the vectors from each force being applied to the object of interest, therefore, the size of the arrow of a depicted force tells us the magnitude of the force and the direction of the arrow shows us its direction. In that way, just by looking at the structure, position and motion of an object, we use a free body diagram to rapidly identify all of the forces we have to take into account in a problem and their basic characteristics.
Take a look at the next free body diagram examples:

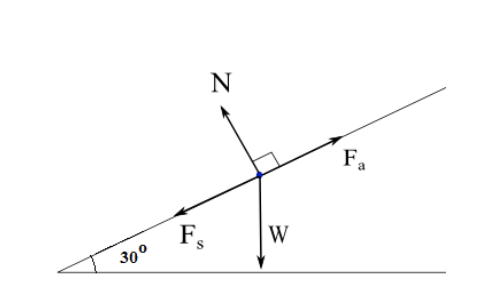

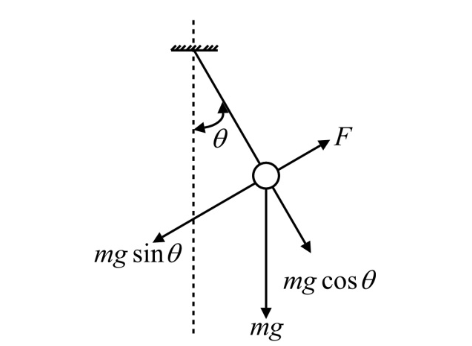
And so, a free body diagram represents all of the applied forces to a body and will help you know the behaviour of this body due to those forces. When drawing free body diagrams is important to keep in mind these usual forces found in any scenario:

Where represents the Normal force (usually named "N" too). = friction force, = applied force and = force of gravity (also represented as "" or "mg", given that it is equal to the weight of a body).
As you may have already noticed from the examples given above, although a free body diagram is an absolute must in any physics course and studies, such type of a force diagram happens to be very useful in different areas of study and work. For example, in engineering during the manufacturing of transportation vehicles there could be many different elements and reasons where a free body diagram (force diagram) would be necessary so engineers can keep in mind every single variable influencing the safety of the passengers aboard the vehicle. Starting by the stability of the vehicle, the friction and traction of the wheel materials on different kinds of terrain, the center of mass of the whole vehicle, etc. Other part where force diagrams are useful while producing a car is when thinking on the seatbelts and passenger safety. One needs to be aware of the magnitudes of the forces and the points in which they would be felt the most in case of an impact and how would this be taken by the receiver inside the car (or truck, whichever you are imagining). So now you have an idea why free body diagrams are important, similar case comes when building a house or a building, architects have to think on the proper infrastructure which will provide a stable base for something of such weight and it will always depend on the terrain this is being built in and the seismology of it (to be prepared in case of earthquakes if needed).
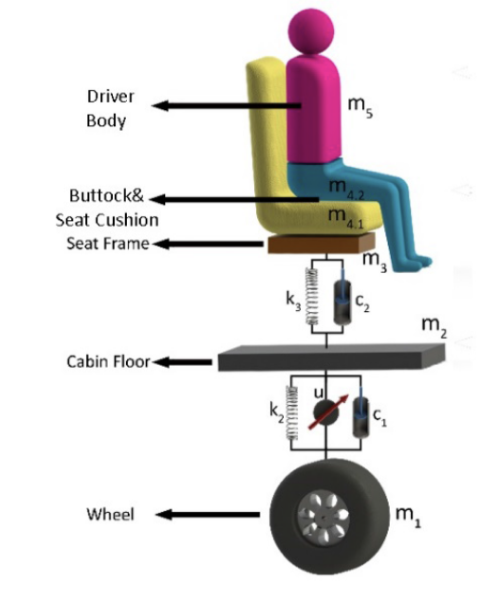
But you may be thinking, engineering is closely related to physics, and you are completely right, engineers study and work with much of what a physicist him/herself does. So let us talk about free body diagrams in completely different areas then. Would you like to be an artist someday? An artist needs to know the world, its form, its balance, its real beauty and so, more often than not you will find that free body diagrams can be found in different artistic areas such as design:
When home decor artists are designing furniture for a new line they have to take into consideration the use of the customer in order to provide comfort, that means, designers need to be aware of the usage, positions and weight of the targeted customers in order for them to produce a good quality and well thought product. There shouldn't be a surprise then than when making an ergonomically designed piece of furniture, there probably are many force diagrams on the process.

In order to produce a beautiful body silhouette while dancing figure a ballet dancer has to know about good posture, and good posture is all about knowing how to move and positionate the human body in a way that weight is balanced in one of more points of contact to produce certain shapes and figures. Since ballet dancers deal with complicated positions, they need to know how to move around their weight from one position to the next, how to jump and how to fall, causing the least stress on their muscles in order to protect themselves from injuries.
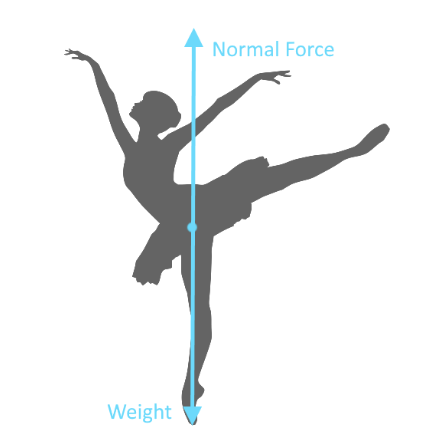
Special and oversimplified free body diagrams are used by dancers to study their posture and shapes (oversimplified because if we were to draw every single different tension and force applied by a dancer's muscles during a routine we would probably miss many of them in our intent and would get tired of drawing so fast! That is how amazing the human body is).
But if you are more interested in something like an outdoor sport, what we just talked about posture is as useful in ballet as in hiking in order for the body to withstand walking for long distances at different terrains. But now, let us think on cyclists. Be it a speed cyclist or a long distance one, a cyclist benefits from being aware of the forces they are "pedaling" against of: surface friction and air resistance.
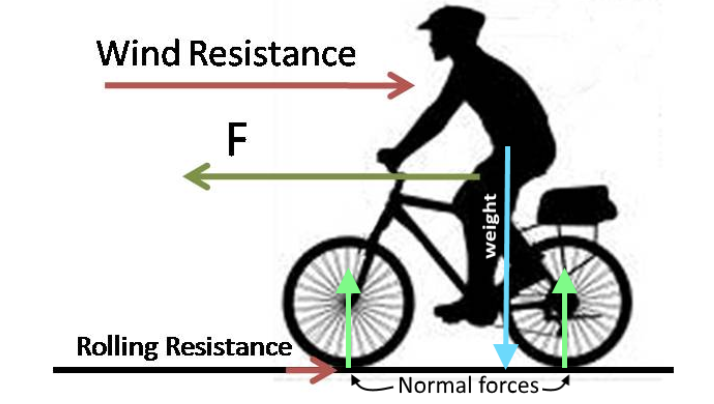
And so, since we live in a world full of matter and energy where we are in constant motion, we can pretty much draw a free body diagram of anything around us and this will always help us understand the physical behaviour of whichever object (or an entire system) you are studying. As long as you can identify the forces that are influencing the motion or position of a body, you can draw a free body diagram describing it. Now, are you ready to look at the world which such inquisitive eyes? Let us learn how to draw free body diagrams!
For a few more free body diagram examples you can visit this article which contains graphics and explanations.
How to draw a free body diagram
Summarized steps on how to draw a free body diagram:
- Identify the body you want to make the free body diagram of. Remember that you need to pick ONE body only, since you will be looking at the effect forces have on this particular object only. And so, forget about the environment surrounding this object, just keep in mind any influence (force such as a pull or a push) on the body itself.
- Make a simple drawing of the body you are studying. As long as the drawing represents its general shape is fine.
- Identify all of the forces acting on the object of interest and draw them using arrows which point in the direction that the forces are being applied (if one of the forces is pushing on the body of interest, then its arrow should be pointing towards the object. If one of the forces is pulling on our body of interest, then its arrow would be pointing away from the object, etc).
- Repeat this step as many times as needed for every single force you can identify.
- Label all of the forces (including their magnitudes if known).
- Make sure to not forget the normal force!
Free body diagram exercises
Now let us have some free body diagram practice with the next exercises. At this time, you can probably identify the forces and draw them easily, so this is just a final assessment so we can finish our lesson. Remember you can continue to make your free body diagrams on your own of anything you see on your daily life, one of your friends leaning on a wall, kids playing football in a field, a person flying a kite, just pick your object of interest and identify the forces that are producing its behaviour and you should be able to draw free body diagrams in your head really quickly.
Example 1
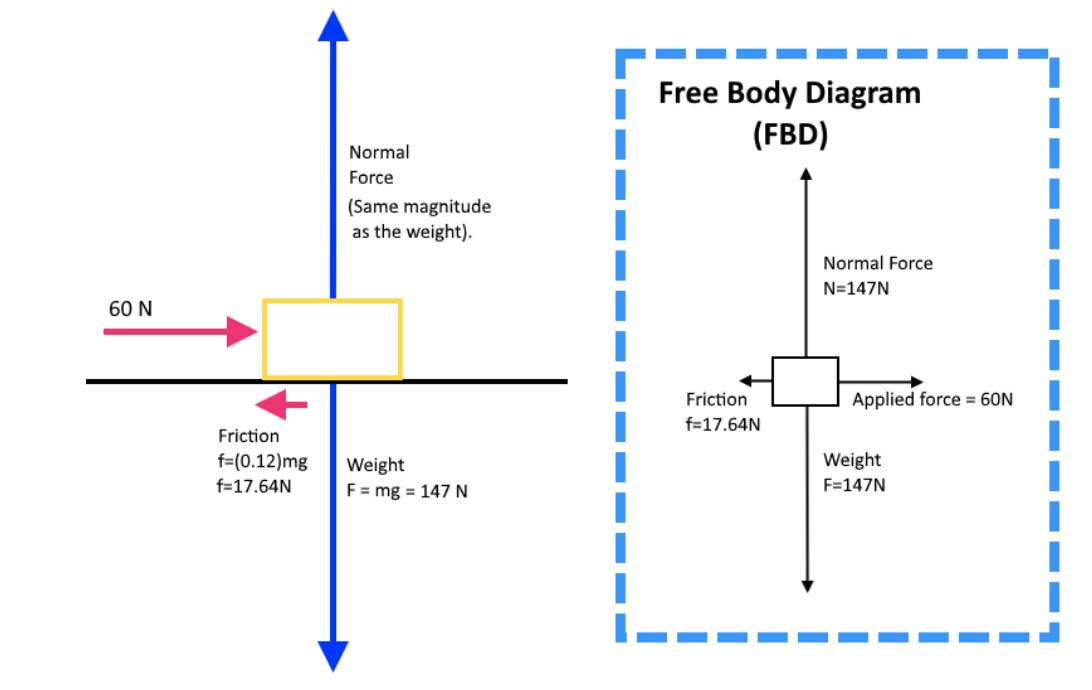
From rest, a 15kg box is pushed across the floor horizontally with an applied force of 60N. The coefficient of friction is 0.12. Draw the free body diagram.
Example 2
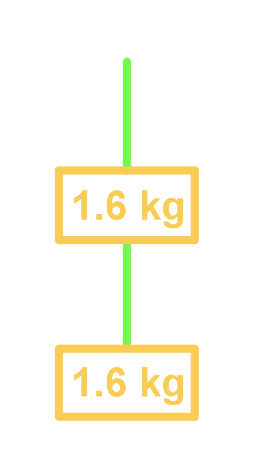
Two boxes (both 1.6kg) are hanging by a rope. Draw the free body diagram of the forces acting on the boxes.
Example 3
You are holding a book against the wall by pressing it against the wall horizontally. Draw a free- body diagram of the forces acting on the book.
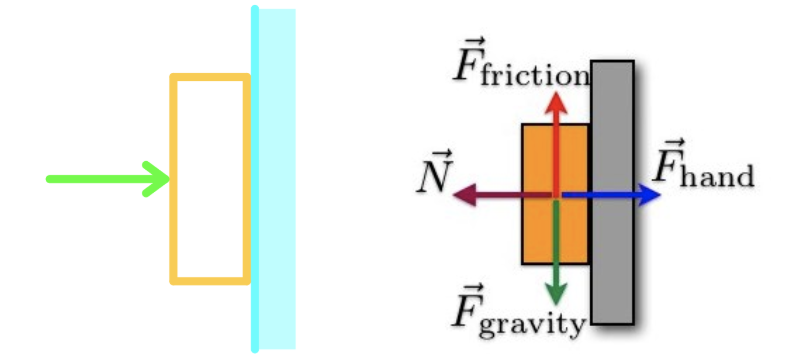
For another deep reading on what a free body diagram is and how is it used you can visit the next article on what are free body diagrams.
- How to draw a free body diagram
- Normal force
- Force of friction
- Problem solving with multiple forces acting on an object
Notes:
- Net force is the vector sum of all forces acting on an object.
- To add all the forces acting on an object, it helps to draw a free body diagram: a diagram that shows all the force vectors acting on the object.
- Normal force is the force of a solid object pushing back on an object that pushes on it.
- Normal force comes from the compression of the matter in the surface that a being pushed on.
- Normal force always acts perpendicular to the surface that is pushed on.
- Friction is the force that resists the motion of one surface sliding across another.
- Friction comes from the surface roughness of the two surfaces rubbing against each other.
- Friction acts parallel to the surfaces that are rubbing, and in the opposite direction from the direction of motion.
sum of all forces, in newtons (N)
net force, in newtons (N)
mass, in kilograms (kg)
acceleration, in meters per second squared


